Friday, August 31, 2012

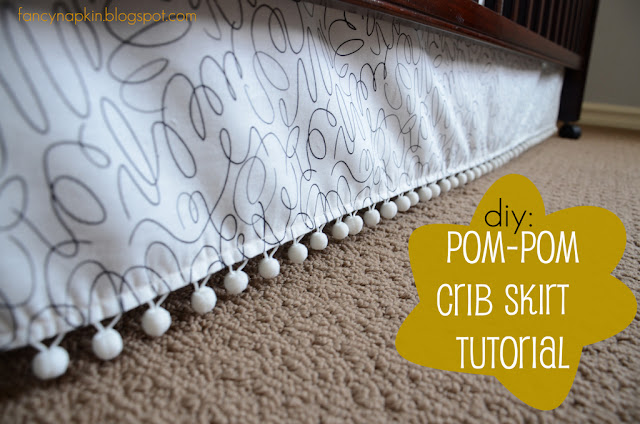
.diy: pom-pom crib skirt tutorial.

I have another nursery related tutorial to show you all. The Easy Pom-pom Crib Skirt!
Initially was going to just buy a standard crib skirt, but after knowing how easy the diy crib sheets where, I figured I'd again take a crack at making my own. This also gave me the opportunity to customize them a little and put my own personal spin on it with those wicked cool pom-pom's.
Done and Done.
I'd consider this another check off the old baby to-do list :)
So here's how I made mine. Easy, Quick and Unique.
1] Get your supplies. You will need: 2 yards of fabric [for a standard sized crib], scissors, sewing machine, pom-pom thread [if that is even what it's called], measuring tape, pins, flat thumtacks, and an iron.
2] Measure your crib. You'll need three measurements and it'll probably be very similar to mine if you have a standard-sized crib. Length of the longest side [51.5 inches], Length of the two shortest sides [27.5 inches] and height when the mattress is at it's highest setting [20 inches].

3]  Cut your fabric. You'll be cutting out 3 rectangles of fabric [two short lengths and one long length. I didn't do the backside as my crib will be against the wall]. Add 2 inches to the height measurement so that you have room for the top of your fabric to wrap over the top of the mattress support beam. Add 1 inch to all the measurements for the seam.
  • One long rectangle length for the front. For me this was 52.5 inches x 23 inches [length of the long side, plus 1 inch seam allowance x height, plus 2 inches plus 1 inch seam allowance].
  • Two short rectangle lengths for the sides. For me, this was 28.5 inches x 23 inches [length of the short side, plus 1 inch seam allowance x height, plus 2 inches plus 1 inch seam allowance].
**I found this to be the hardest part of the whole project as you need to cut these panels straight. I used a bunch of pins and measured all the way around pinning every 2 inches or so and then cutting along the pins. Seemed to work pretty good.

4] Hem and sew sides. You will now need to iron and sew all four sides of each rectangle piece which is super easy. Turn up 1/2 inch on each side, iron that down and then sew. This will make your edges nice and clean.

5]  Be happy that you are almost finished. Turn it over and make sure it looks similar to this.

6] Attach your pom-pom ribbon. Now you'll need to secure your pom-pom ribbon by sewing it to the bottom edge of each of the three rectangle pieces. I just pinned mine at a couple spots and then sewed it onto the panels. Pretty darn easy.
Hint: When sewing the pom ribbon on, make sure the you follow the same hem as before so that you won't see two rows of thread.

7] Attach all panels to your crib. Now the fun part, attach each panel to the crib with flat thumbtacks. I have a crib with a wood support beam that I just pinned them too. If you have wire springs instead of a wood beam, at this point you'll have to sew a ribbon onto each corner of the panels and then tie them to the springs. I found a great tutorial by Christine, over at her blog Just Bella.

7] Put your Mattress back and high-five yourself on the back for a job well done! Or is that something that I just do? Either way, You're finished! Now you can go hide all those extra storage boxes of baby's clothes, diapers, books and toys.

Thursday, August 30, 2012

.cloth diapering.

....and some pictures that really have nothing to do with the context of this post. 
At least the polka's are cute.
This has been a pretty hot topic over at the Trebaczkiewicz household as of late. Do we or Don't we?
And it'll be a very boring topic to those not interested in the day-to-day of having a new baby in the house so please excuse this post, but for any mommy out there, I require a little of your help.

We've decided that we're going to try our hand at cloth diapering our little wee babe.

Now, I should point out before I get going, that we think it'll be best to keep the cloth diapering to the house and stick with disposables while out-and-about. Just the ease of not having to tote around dirty diapers appeals to me and I think it'll make things a little easier for us and others around us.

I should also mention that the idea of cloth diapering I find both scary and exciting. Scary because of the extra work involved, and exciting because of all the benefits that cloth diapers bring.

Benefits, such as, after the initial shock of paying for them, you should never again have to fork out for diapers thus saving big buckaroos. Then there's the benefits of being green. Saving the environment one poop at a time! I also personally think that the cloth diapers now-a-days are way cuter than disposables. They have changed so much since my mom was cloth diapering my little sister and I, and they come in all sort of fun colors and patterns.
Then there are the disadvantages. Things such as the extra laundry and time associated with CD. And having to deal with the 'dirties' [which I may have found a solution with disposable diaper liners!].
Now, since I'm a [almost] new mommy, I really have no clue about what I need or what brand will work best. It'll all be trial and error, so here's where you come in......Any mommies that have gone the cloth diapering route and can send me any tips or recommendations?

Here's what I've heard.....
TYPES: I've heard that the one-size kind [it grows with your baby with adjustable snaps] is great for extra absorbency and night time sleeps, however isn't great for a super snug fit which can cause leaks on an everyday basis. This is also great as an economical option as you only buy one diaper for your babies growing body.
All-in-One size cloth diaper - Itti Bitti
I've also heard that perfect fit or pocket size type diapers [sized exactly for your babies weight and cannot grow with your baby] are great for a snug fit, thus preventing less leaks and less bulk. These appeal to me greatly as I like things fitting properly and the idea of less leaks kinda nails it. The con is that you have to get a bunch of different sizes, which can cost a little more.
perfect fit cloth diaper - Fuzzibunz

NUMBERS: So, how many diapers would you recommend?
I heard for a newborn, which poops alot, you will need quite a few diapers in those first precious few months. If you think about it, on average a newborn eats every 2 hours, which basically means they poop every 2 hours. This roughly works out to 12 diaper changes per day.
HOLY COW!!
So if I did laundry every day, I would need approximately 18 diapers!
Is this math correct?? Mommies help! How many did you need?

CLEANING: I also need help with cleaning methods.....what is your best way to clean them and dispose of the nasties? As I mentioned above, I heard of these disposable diaper liners that basically allow you to flush the solids down the toilet and then it's easy to throw in the wash. I guess this is the one thing I'm a little nervous about. ...Handling poop. Yuck. I don't want the smell floating around the house either, so I ask you, what's your secret methods? Do you store your dirty diapers in a closed diaper pail?

OR are we just crazy for trying this??

Tuesday, August 28, 2012

.edmonton review: prairie baker.

I have a little confession to make: This post has literally been sitting in my draft files for months. Like since April, so I am really not kidding. And I have no real reason as to why that is, because this was one of my favorite places to photograph. Who knows why I do the things I do..... 
I do know, however, that I must share with you the lovely morning that I spent with all the charming folks over at the Prairie Baker [which is located in St. Albert at one of my favorite places to spend a day, the Enjoy Centre].
They kindly contacted me to spend some time photographing, reviewing, and just basically hanging out behind-the-scenes to give you all a little taste of what goes on back there. After our initial greetings, I was blown away at the talent these bakers yield. From Master Baker Isabelle Davis who creates those mouthwatering-good loafs, to the man behind the gorgeous sweets you see in the front display window, Curtis Jones. Not only is each croissant, loaf, tart, truffle, macaron, streusel, or cake delicious, but they are also beautiful. Each piece acting as it's own work of art.
I highly recommend the Pullman loaf [my fav!] or be a little adventurous with the delicious Carrot Bread [a light rye sourdough loaded with fresh shredded carrots, organic sesame and pumpkin seeds]. I would also mention that you must try the passion fruit chocolate truffles and really any flavor of macaron.
And for those readers far and away, Prairie Baker has also kindly given me a recipe [click here to make the Raspberry Lemon Curd Macarons], so that you can perhaps bring a small taste of heaven home with you too.
disclaimer: I seriously had such a hard time choosing which photo's to share, as the food I photographed are all so scrumptious to look at. I warn you now....I hope your stomach is full or I may be sending you into a craving overload and running straight out the door to the Prairie Bakery.
Curtis Jones
Zofia
A big thank you to all the staff at the Prairie Baker, for allowing me to spend some time in the kitchen, getting in the way and just basically trusting me not to drool over all the desserts and breads. It was very cool to see how you create your magic back there, and I am forever a loyal fan to the many breads, cakes, chocolates and especially those macarons that you create for us on a daily basis.
People! If you haven't been yet, I highly recommend!

.raspberry lemon curd macaron.

Raspberry Lemon Curd Macaron
[recipe from the culinary institute of America and used at the Prairie Baker]
**This recipe is for a basic raspberry macaron. You can fill it with any filling you please, or just use the lemon curd recipe below. Happy Eating!
Raspberry Macarons
[makes about 2 dozen]

Ingredients:
2/3 cup [3 ounces/85g] ground Almonds
1 1/2 cups [5.25 ounces/150g] Powdered Sugar
3 large Egg Whites, at room temperature
5 tbsp Granulated Sugar
1 tsp Vanilla Extract
2 tbsp Dried Raspberries, ground in food processor
drop of Food Coloring, optional
Directions:
1] Line a baking sheet with parchment paper and draw 1 inch circles on the paper to use as a guide when piping out the macaroon batter. Space the circles at least 1/2 inch apart.
2] Grind the almonds, powdered sugar, and dried raspberries together in a food processor and sift the mixture twice.
3] Beat the egg whites at high speed until they become foamy, and then slowly add the granulated sugar. Continue beating the meringue until it is glossy and holds stiff peaks. Carefully stir in the vanilla extract.
4] Carefully add half the almond mixture to the meringue and fold it in with a spatula. Add the rest of the almond mixture and mix it lightly until completely combined. Add food coloring if you want.
5] When the almond mixture of completely combined with the meringue, spread the batter against the side of the bowl. Next, scoop the batter from the bottom and flip it over. Repeat approx. 15 times. This step is called 'macaronnage' and gives the finished macaron it's sheen. When the mixture is done, the batter will be firm and will drip slowly when scooped up by a spatula.
6] use a pastry bag to pipe the batter onto the prepared baking sheet. Allow space for the macaron batter to spread slightly.
7] Rap the baking sheet against the countertop a couple of times, and let the batter dry for 15 to 30 minutes. A thin crust should form on top of the macaroon while drying. They are ready to bake if the batter does not stick to your fingers when touched.
8] Preheat oven to 375F. Stack the baking sheet with macaroons onto an empty baking sheet for baking. Using 2 baking sheets ensures that the bottoms of the macaroons do not overbake. Bake for about 15 minutes. When done, the macarons should look slightly crisp.
9] Allow macarons to cool on baking sheet in a wire rack. Remove from baking sheet when completely cool, and sandwich together with filling.

Lemon Curd Filling
Ingredients:
2 large Egg yolks
1/4 cup Sugar [divided use]
1/4 cup unsalted Butter, diced [divided use]
1/4 cup freshly squeezed Lemon Juice
1 tsp grated Lemon Zest
1 tbsp Cornstarch
Directions:
1] Blend egg yolks with about one-third of the sugar and set aside.
2] Combine two-thirds of the butter, the remaining sugar, the lemon juice and lemon zest in a saucepan and bring the mixture to a boil over medium heat. Be sure to stir the mixture constantly. Once mixture boils, temper the egg yolks by gradually adding about one-third of the hot butter mixture to the yolks. Whisk constantly. Once combined, add the rest of the hot butter mixture, and return the mixture to the stove. 
3] Continue cooking over medium heat, stirring constantly, until the mixture comes to a boil again. Once mixture boils, add the cornstarch and remaining butter, reduce the heat, and whisk until completely combined.
4] Remove pan from heat and strain the curd through a sieve to remove any pieces of curdled yolk. Place the bowl of curd in an ice bath to cool, stirring occasionally.
5] Assemble curd filling in between each macaron 'cake'.

Monday, August 27, 2012

.at 34 weeks.

dress: old JCrew [similar] | earrings: JCrew | watch: Fossil [gifted] | sandals: Urban Outfitters [similar]
Yesterday, all I could think was 34 weeks!?!? Seriously? Where has the time gone? 
And to me, 34 weeks means a lot of things, but most importantly it means that I have only 6 more weeks to go [give or take, depending on how stubborn our little babe decides to be]. 
Wow.
I feel I'm in this weird mixed emotional bubble. A bubble of waiting. Of excitement. Of longing. Of anticipation. Of happiness. And even a little sadness. In one moment, I cannot wait to meet my baby and smoosh it with kisses and love, and then the next I am sad that this beautiful experience called pregnancy and growing this sweet baby is going to be soon over. I have loved [almost] every single minute of being pregnant and I just know I'm going to miss this ever-growing belly so very much.
at thirty-four weeks:
::i have begun to notice that simple things are becoming a little more difficult. like picking up a dropped pen or putting on my shoes. oh dear, and don't get me started on carrying the laundry basket!
::i am still loving the no-pants policy over at casa-de-trebaczkiewicz.
::i've decided that if i do have to get dressed, then dresses are the way to go. pants sort of suck right now. so uncomfortable.
::every single 'normal' shirt that i own, is now a belly shirt.
::i am loving the cooler weather. that breeze at night is like heaven.
::i am craving chocolate milk and iced tea. but not sweet iced tea. no, i want the cold tea kind.
::i know I am getting bigger and bigger each day. currently i've only gained 11 pounds total, but the doc said I should grow about 1 - 1.5 lbs a week. holy smokes, that seems like a lot.
::i am getting excited for my family baby shower that my lovely mothers are throwing us. how exciting to play games like 'smell the diaper' ;)
::i've noticed that i get a lot of random looks from strangers. they seem to want to know the story [they always do a look from me, to my belly, to my ring finger, then to peter]. it's human nature i guess.
::i am almost finished the nursery. just have to hang some prints, finish some diy's, get a new comfy chair and organize.
::i am still napping a significant amount. although, i've always been a napper, so not much has changed on that one. 
::i am super amused that my belly button keeps holding on. it just doesn't want to fully 'pop' yet. any day now i am guessing.

For those of you who don't think in terms of weeks...this works out to 8 1/2 months pregnant with only  a month and a 1/2 more to go!
On another note, yesterday Pete and I went to my work's 100th year celebration bbq over at old Fort Edmonton Park. It was a beautiful sunny day that we spent wandering around the old town and playing a little mini golf. Needless to say, I have no future as a putt-putt pro and Peter could seriously consider quitting his job to do it full-time. He annihilated me. Two hole-in-ones!
So, I blamed my game on the baby bump [sorry baby!]. ha.

Tuesday, August 21, 2012

.diy: crib sheet tutorial.

Remember my impossibly long 'baby to-do list' that everyone figured would make me want to pull all my hair out? Well, things are progressing nicely on it and with the husband's help, I have managed  to check a few more items off the list [yeah me!].
Most importantly, and what I want to show you today, is what I worked on this weekend.
DIY: Crib Sheets.
I am first going to admit that I have spent way too much time searching all over the mighty internet for modern crib sheets, with very limited luck. And although yes, there are certainly a lot of options if you look hard enough, most of the cute ones [and all the ones i gravitate too] come with a hefty price tag. Ouch.
So after realizing that I can probably just make them myself, I busted out my old sewing machine [a gift from my sweet father that is not used nearly enough] and attempted to create my little babe's new sheets.
And I am happy to report, that they actually turned out pretty darn cute. Even if I did choose a christmas-ish fabric in the middle of August :)
*fabric found at fabricland
With the help of a mis-mash of tutorials, via youtube & pinterest, here's how this beginner sewer [moi!] made her very own crib sheets. I hope you give it a try.....you might just surprise yourself. I know I did!
DIY:
[step one] Collect your supplies.
Note: Make sure you pre-wash your fabric before cutting. It may shrink a little and I'd be so upset if you did all the work, just for it not to fit once washed!

[step two] Cut your fabric into a rectangle that's 45 x 67 inches [114.5 x 171 cm].

[step three] Cut an 8 x 8 inch [20.5 x 20.5 cm] square out of each corner.

[step four] Pull the two sides of one corner together, with the good side of the pattern on the inside. Pin together to make a 'pocket'. Do this for each of the four corners. Then sew each pinned side together.

[step five] Now iron the edge of your fabric over 1/4 inch going all the way around. This is creating a  casing which you will string your elastic through.

[step six] Sew down the casing, going the entire way around your fabric.
Note: Make sure you put a pin at the start and stop point so that you leave an opening to get the elastic in and out. Start sewing at the start point, and stop sewing at the stop point. Easy enough, right?

[step seven] Attach a safety pin [just large enough that it'll fit in between your casing] on one end of your 1/4 inch wide elastic and pin down the other end to your sheet [this is so that it doesn't get pulled all the way through]. Start stringing the elastic through the casing, all the way till it reaches the other side.

[step eight] Sew the two ends of the elastic together, using a zigzag stitch to secure it snugly. Then sew up the open hole of the casing for a clean finish. And your DONE!

Now go make a bunch more! It's what I did! Here's a few others that I quickly crafted....
Next up? A crib skirt, which is very needed to hide all that extra storage under the crib and hide that wood bar. And maybe some burp cloths with all the extra fabric pieces?
I think I'll hunt down a cooler fabric store this time around though....now that I'm an expert and all ;)
So, what do you think?