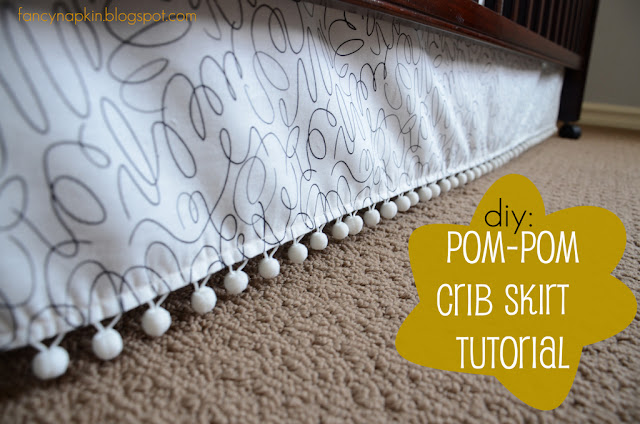
I have another nursery related tutorial to show you all. The Easy Pom-pom Crib Skirt!
Initially was going to just buy a standard crib skirt, but after knowing how easy the diy crib sheets where, I figured I'd again take a crack at making my own. This also gave me the opportunity to customize them a little and put my own personal spin on it with those wicked cool pom-pom's.
Done and Done.
I'd consider this another check off the old baby to-do list :)
1] Get your supplies. You will need: 2 yards of fabric [for a standard sized crib], scissors, sewing machine, pom-pom thread [if that is even what it's called], measuring tape, pins, flat thumtacks, and an iron.
2] Measure your crib. You'll need three measurements and it'll probably be very similar to mine if you have a standard-sized crib. Length of the longest side [51.5 inches], Length of the two shortest sides [27.5 inches] and height when the mattress is at it's highest setting [20 inches].
3] Cut your fabric. You'll be cutting out 3 rectangles of fabric [two short lengths and one long length. I didn't do the backside as my crib will be against the wall]. Add 2 inches to the height measurement so that you have room for the top of your fabric to wrap over the top of the mattress support beam. Add 1 inch to all the measurements for the seam.
4] Hem and sew sides. You will now need to iron and sew all four sides of each rectangle piece which is super easy. Turn up 1/2 inch on each side, iron that down and then sew. This will make your edges nice and clean.
5] Be happy that you are almost finished. Turn it over and make sure it looks similar to this.
6] Attach your pom-pom ribbon. Now you'll need to secure your pom-pom ribbon by sewing it to the bottom edge of each of the three rectangle pieces. I just pinned mine at a couple spots and then sewed it onto the panels. Pretty darn easy.
Hint: When sewing the pom ribbon on, make sure the you follow the same hem as before so that you won't see two rows of thread.
7] Attach all panels to your crib. Now the fun part, attach each panel to the crib with flat thumbtacks. I have a crib with a wood support beam that I just pinned them too. If you have wire springs instead of a wood beam, at this point you'll have to sew a ribbon onto each corner of the panels and then tie them to the springs. I found a great tutorial by Christine, over at her blog Just Bella.
2] Measure your crib. You'll need three measurements and it'll probably be very similar to mine if you have a standard-sized crib. Length of the longest side [51.5 inches], Length of the two shortest sides [27.5 inches] and height when the mattress is at it's highest setting [20 inches].
- One long rectangle length for the front. For me this was 52.5 inches x 23 inches [length of the long side, plus 1 inch seam allowance x height, plus 2 inches plus 1 inch seam allowance].
- Two short rectangle lengths for the sides. For me, this was 28.5 inches x 23 inches [length of the short side, plus 1 inch seam allowance x height, plus 2 inches plus 1 inch seam allowance].
Hint: When sewing the pom ribbon on, make sure the you follow the same hem as before so that you won't see two rows of thread.


I love the pom pom fringe! Nice work, Erinn.
ReplyDeleteThanks Christine :)
DeleteI'm trying to practice up on my crafting skills, so I get invited over to crafternoon ;)
xoe
Good job! I JUST bought a sewing machine and can't wait to start using it (once I stop being afraid to unpack it). Hopefully by the time I have a baby I can sew the bedding and curtains.
ReplyDeleteChristine! That was me for 3 years! Seriously, it just sat in it's sad little box waiting to be used.....so I suggest you just pull that damn thing out and make something :)
Deletexoe