Showing posts with label how to. Show all posts

Wednesday, May 28, 2014

.dot com.

fancy napkin got herself a .com handle! and a little facelift. 

what do you think? 
i know, not much pizzazz [or colour] going on but i am loving the clean lines and simplicity of how she looks. still have to clean it up a little, add a few more page links and fun for your viewing pleasure, but other than that...done.

i thought it might be fun if you are just joining us, or since i took a 3 month hiatus, re-discovering us! to walk you through a few areas of interest.

1] my 'hello' page gives you a little more info about me & my family. growing quickly from 3 to 5! yep, if you didn't catch this post here, i am pregnant with twins due sometime in october and we are elated!!

2] 'categories' basically send you to a new page of interest. i personally like the food section, but then again they are all my fav recipes so i may be a tad bit biased. that, and i'm pregnant so food is always on my mind. click on each link to have a look.

3] 'the skinny' link will take you to an upcoming project i am currently working on. seriously big news in these parts!! however since it's not quite ready to be published you'll have to be satisfied with my sneak peeks here and there on instagram or facebook. but i am beyond excited and happy about this and cannot wait to officially share the news with you all. coming very very soon...

4] speaking of instagram or facebook, you can go directly to those sites if you click on the little triangles above my 'hi there' picture. also applies to pinterest and twitter. obvious i know, but my not-so-savvy-with-the-computer grandmother may be reading this?! and besides, i'd really really like you to follow me. ha!

5] the 'shop' link will take you to some of my most favourite and currently loving items that you can purchase online. i update this regularly as i like to shop, a lot. however, for total and utter disclosure i may make a few cents off your purchase if you click and buy. just saying. but trust me, the 50 cents i might make doesn't affect my opinion or likes. what you see is what i've boughten or would buy. simple as that.

so that's a quick rundown of what fancy napkin is all about. i am planning on having more regular daily posts and perhaps a few of my fav re-occurring series; like my monthly favourites videos, my monthly shopping lists, book review videos, weekly recipes, bump style updates, my weekly happy things, perhaps a jack/kiddo style report and a monthly edmonton date-night review, just to name a few. 
hope this sounds like a good plan and i sincerely hope you'll check back once-in-a-while. i really did miss you.
xoe

Thursday, April 4, 2013

.diy: rustic felt ball mobile.

after searching [and searching and searching] for an affordable 'modern-rustic' themed mobile for jack's nursery [yes, modern-rustic! i wanted a wood rustic feel, with a modern twist to it], i decided that it couldn't be that hard to make one. so, while I absolutely love the look of the feather/arrow mobiles floating around pinterest [favorites seen here and here], i wasn't crazy about the price tag's going along with them. i was also searching for something with a little wood on it to pull some darkness to the area above the change pad and match a few darker pieces i had in jack's room. and this is what i came up with.

a fun, super easy project that adds just the right amount of modern-rustic to the little man's nursery. 

and bonus: he adores it!

here's how i did it:

Thursday, September 6, 2012

.diy: the map love frame.

About a month ago I finally finished a personal diy project that I've been working on for some time now. It was actually a gift for some very wonderful friends of ours and I'm so pleased with how it turned out.

Since we travelled to see them get married in England [yes, mr. james + mrs. fiona] , we struggled with the whole 'gift' option. The good ol' question, 'What do you get them?'
You can't pack up a giant present abroad, and we knew right off the bat that giving money wasn't an option [too impersonal for how close we are with this couple]. We also knew that we wanted it to be something thoughtful and hopefully very meaningful to them. Something, so that every time they look at it, they are reminded of their special day.
So after throwing around a couple ideas, we decided to run with an adaptation from this original idea.  What do you think?
While, we spent the extra $ to get a custom frame and mat made for this gift, you can certainly diy this yourself [for cheap!] with these simple steps:
one] Just grab an old frame lying around.
two] Measure 3 holes and cut out the background mat from thick card-stock of your choice [you could really have some fun with matting options here!]. I went with squares, but you could do ovals, hearts, or even just use a pre-cut mat that comes with the frame. Easy! 
three] Print off some favorite map pictures or just tear from a atlas. Position your printed or cutout map picture over where you want it to show (for example the town or city) using your background matting cutout as a template. I choose to show the entire country [Australia + England + Canada] but you could also just show the town/city with a close up of roads or streets.
four] Grab some colored embroidery thread and a big needle and poke holes in a heart shape over the town that you met, married, and live on your printed map pictures. Then thread your heart, being careful not to pull to hard which might tear the paper. Tape down the ends of the thread on the backside of the map picture once you are finished.
five] Now position your finished embroidered map picture into the matting and tape down the picture onto the back. I choose to go with we met in the first square, then we married in the middle square, and finished with we live.
six] Choose a stamp color and small alphabet stamps in the font of your choice. Measure a straight line with a pencil [go light so its easy to erase and doesn't leave a mark] as a guide to stamp down your wording. Again I went with 'we met', 'we married', and 'we live' but you could choose whatever you'd like.
*Another idea would be to add the couples name or last name to the top of the map too.
seven] Put the finished picture and mat into the frame, seal it all up and viola! Cute and memorable picture for your home. 
And I am happy to say that it is now in their possession and I think that they really liked it.
xo

Friday, August 31, 2012

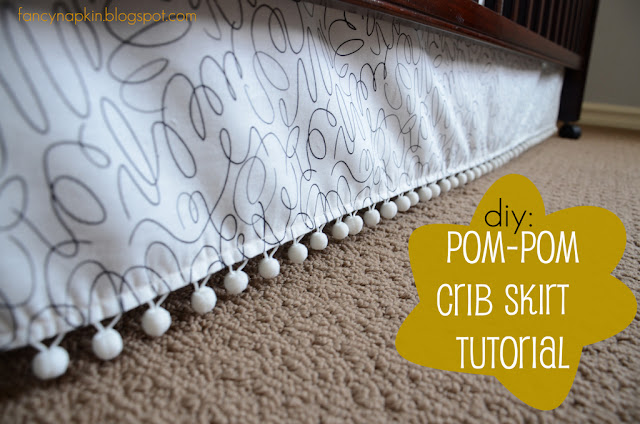
.diy: pom-pom crib skirt tutorial.

I have another nursery related tutorial to show you all. The Easy Pom-pom Crib Skirt!
Initially was going to just buy a standard crib skirt, but after knowing how easy the diy crib sheets where, I figured I'd again take a crack at making my own. This also gave me the opportunity to customize them a little and put my own personal spin on it with those wicked cool pom-pom's.
Done and Done.
I'd consider this another check off the old baby to-do list :)
So here's how I made mine. Easy, Quick and Unique.
1] Get your supplies. You will need: 2 yards of fabric [for a standard sized crib], scissors, sewing machine, pom-pom thread [if that is even what it's called], measuring tape, pins, flat thumtacks, and an iron.
2] Measure your crib. You'll need three measurements and it'll probably be very similar to mine if you have a standard-sized crib. Length of the longest side [51.5 inches], Length of the two shortest sides [27.5 inches] and height when the mattress is at it's highest setting [20 inches].

3]  Cut your fabric. You'll be cutting out 3 rectangles of fabric [two short lengths and one long length. I didn't do the backside as my crib will be against the wall]. Add 2 inches to the height measurement so that you have room for the top of your fabric to wrap over the top of the mattress support beam. Add 1 inch to all the measurements for the seam.
  • One long rectangle length for the front. For me this was 52.5 inches x 23 inches [length of the long side, plus 1 inch seam allowance x height, plus 2 inches plus 1 inch seam allowance].
  • Two short rectangle lengths for the sides. For me, this was 28.5 inches x 23 inches [length of the short side, plus 1 inch seam allowance x height, plus 2 inches plus 1 inch seam allowance].
**I found this to be the hardest part of the whole project as you need to cut these panels straight. I used a bunch of pins and measured all the way around pinning every 2 inches or so and then cutting along the pins. Seemed to work pretty good.

4] Hem and sew sides. You will now need to iron and sew all four sides of each rectangle piece which is super easy. Turn up 1/2 inch on each side, iron that down and then sew. This will make your edges nice and clean.

5]  Be happy that you are almost finished. Turn it over and make sure it looks similar to this.

6] Attach your pom-pom ribbon. Now you'll need to secure your pom-pom ribbon by sewing it to the bottom edge of each of the three rectangle pieces. I just pinned mine at a couple spots and then sewed it onto the panels. Pretty darn easy.
Hint: When sewing the pom ribbon on, make sure the you follow the same hem as before so that you won't see two rows of thread.

7] Attach all panels to your crib. Now the fun part, attach each panel to the crib with flat thumbtacks. I have a crib with a wood support beam that I just pinned them too. If you have wire springs instead of a wood beam, at this point you'll have to sew a ribbon onto each corner of the panels and then tie them to the springs. I found a great tutorial by Christine, over at her blog Just Bella.

7] Put your Mattress back and high-five yourself on the back for a job well done! Or is that something that I just do? Either way, You're finished! Now you can go hide all those extra storage boxes of baby's clothes, diapers, books and toys.

Tuesday, August 21, 2012

.diy: crib sheet tutorial.

Remember my impossibly long 'baby to-do list' that everyone figured would make me want to pull all my hair out? Well, things are progressing nicely on it and with the husband's help, I have managed  to check a few more items off the list [yeah me!].
Most importantly, and what I want to show you today, is what I worked on this weekend.
DIY: Crib Sheets.
I am first going to admit that I have spent way too much time searching all over the mighty internet for modern crib sheets, with very limited luck. And although yes, there are certainly a lot of options if you look hard enough, most of the cute ones [and all the ones i gravitate too] come with a hefty price tag. Ouch.
So after realizing that I can probably just make them myself, I busted out my old sewing machine [a gift from my sweet father that is not used nearly enough] and attempted to create my little babe's new sheets.
And I am happy to report, that they actually turned out pretty darn cute. Even if I did choose a christmas-ish fabric in the middle of August :)
*fabric found at fabricland
With the help of a mis-mash of tutorials, via youtube & pinterest, here's how this beginner sewer [moi!] made her very own crib sheets. I hope you give it a try.....you might just surprise yourself. I know I did!
DIY:
[step one] Collect your supplies.
Note: Make sure you pre-wash your fabric before cutting. It may shrink a little and I'd be so upset if you did all the work, just for it not to fit once washed!

[step two] Cut your fabric into a rectangle that's 45 x 67 inches [114.5 x 171 cm].

[step three] Cut an 8 x 8 inch [20.5 x 20.5 cm] square out of each corner.

[step four] Pull the two sides of one corner together, with the good side of the pattern on the inside. Pin together to make a 'pocket'. Do this for each of the four corners. Then sew each pinned side together.

[step five] Now iron the edge of your fabric over 1/4 inch going all the way around. This is creating a  casing which you will string your elastic through.

[step six] Sew down the casing, going the entire way around your fabric.
Note: Make sure you put a pin at the start and stop point so that you leave an opening to get the elastic in and out. Start sewing at the start point, and stop sewing at the stop point. Easy enough, right?

[step seven] Attach a safety pin [just large enough that it'll fit in between your casing] on one end of your 1/4 inch wide elastic and pin down the other end to your sheet [this is so that it doesn't get pulled all the way through]. Start stringing the elastic through the casing, all the way till it reaches the other side.

[step eight] Sew the two ends of the elastic together, using a zigzag stitch to secure it snugly. Then sew up the open hole of the casing for a clean finish. And your DONE!

Now go make a bunch more! It's what I did! Here's a few others that I quickly crafted....
Next up? A crib skirt, which is very needed to hide all that extra storage under the crib and hide that wood bar. And maybe some burp cloths with all the extra fabric pieces?
I think I'll hunt down a cooler fabric store this time around though....now that I'm an expert and all ;)
So, what do you think?

Thursday, July 19, 2012

.how to: my wavy natural curls.

Since I have really long straight hair I've been asked time and time again how I get my natural-looking wavy hair curls and I always answer the exact same way, "Oh geez, it's ridiculously easy" and I'm not lying. It really is.
So here is my embarrassingly simple way I get my hair to have the look of those somewhat beachy, natural-looking soft waves that everyone seems to be sporting these days. An easy way to look polished without a lot of fuss. 
Also, this is basically the base curls I sport before attempting any other hair style, so nail this down and you'll be laughing your way to hair heaven. Seriously, I have a million other hair styles I can show you after you get some of these curls.
So to my friend Morgan [who has been asking me forever] and although the video quality isn't great, this is for you. xo

Monday, February 13, 2012

.DIY: Valentine Boxes.

and although the stamp here smudged a little, this made me smile. a big fishy kissing a little fishy and blowing heart bubbles!
I can't believe it's Valentine's Day tomorrow and I haven't even mentioned it once! Where has this month gone?!?!
Anyways, last night I was busy as a bee putting together my Valentine's Day Cards. And I say cards, but I actually mean boxes. "Valentine's Day Boxes".
This was my interpretation on a Valentine's "card" for some special people in my life.
A sweet message that you only get after working your way through a sweet treat.
And it's ridiculously easy to do.......
You'll Need:
Small boxes
Marker
Candy of your choice [i picked jelly belly because everyone loves jelly beans!]
stamp with a cute picture like my big fishy kissing a little fishy [+stamp pad], optional
Directions:
one] Construct your boxes.
two] Write a sweet message on the inside bottom of the box. You can also add a stamp if you'd like or draw a cute picture.
three] Fill box with your favorite candy till the message is completely covered.
four] Close box and add a pretty ribbon. Mail or hand deliver.
Happy Early Valentine's Day!!!

Thursday, June 23, 2011

.Summer Relaxation.

Have you been feeling like the little bit of summer that we get each year, especially here in Canada, is quickly slipping on by and you just haven't been able to enjoy any of it? 
Ya, me too {it's almost the end of June?!?!}
Then I came across this article over at Martha {we're on first name basis', sort of like BFF's} that gives 60 Unique ways to relax and have some fun this summer.
I took my favorite 30 and put them here for you to enjoy also.
30 Unique Ideas for Summer Relaxation + Fun
{pictures are all via Martha Stewart}
1} Make your own mood mists....they are known to balance out your mood.
2} Make your own Skin Brightening Mask. Help make your skin rosy and glowing all summer.
3} Make a Handmade Kite. Then fly it like a kid again.
4} Pack a picnic and head to a park. Better with a loved one. You can snuggle.
5} Try an Outdoor Yoga Routine. Get routine here.
6} Make your own Fragrant Tea Balls. This actually sound so relaxing.
7} Read in a Hammock. I adore hammocks. And it just may be on my outdoor wish list.
8} Try this Weekend Revival Plan.
9} Make some hanging Candle Chandeliers. I will actually try this. For sure.
10} Or Maybe I'll make these....Hanging Lanterns. Or maybe I'll just make them both.
11} Visit the local dog park. Or try out some new trails. Toto will love you.
12} Tiki-Torch Anchors. A new twist on the tiki torch. Would be good to keep the mosquito's way.
13} Make your own Beach Body Scrub.
14} Instead of spending a lot of money, try an At Home Spa.
15} Go for a Bike Ride.
16} Love these DIY Light bottles.
17} Throw a cool themed party with these Vellum Shields.
18} Make some ice cream. Or try this easy Melon Sorbet recipe. Or try Ice cream on a stick.
19} Go to a baseball game and bring a bag of sunflowers seeds. Or try out Kick/Soccer Baseball.
20} Sew up some magnetic garden gloves {I need these}.
21} Make yourself a cheese spread. Tips here.
22} Have a BBQ out at the park.
23}Make these Beautiful Flower Votive displays.
24} Make some cool Mayonnaise dips to spice up your summer Burgers.
25} Make this Berry Spread from your abundance of summer berries.
26} Make some Natural Plant Markers for your herbs out of flat river rocks.
27} In the sun too long? Make your own Sunburn Soothers out of natural ingredients. Here also.
28} Make these delicious Ice Teas.
29}Make some pickled veggies. Super easy!
30} Host with this beautiful natural centrepiece. Make it all by yourself. Feel proud.